How to get Comcast PACE DTA working in Myth in Ubuntu Hardy
Comcast recently shipped me 3 Digital converter boxes to support the upcoming switch to an all Digital Signal.
Unfortunately the digital signal requires using the new digital converter boxes to change channels. This is a huge inconvenience to anyone using a 3rd party DVR as well as for anyone who recently purchased a new digital TV which features like PIP as these features are likely not to work with the new converter boxes.
Luckily for those of us running MythTV, we just need to make some minor changes to get our Home-Brew DVR work with the new converter Boxes.
This How-To only covers the changes needed to get your MythTV box working with the new PACE DTA converter box. This tutorial assumes you have an existing working MythTV installation and does not cover initial setup and configuration of Myth.
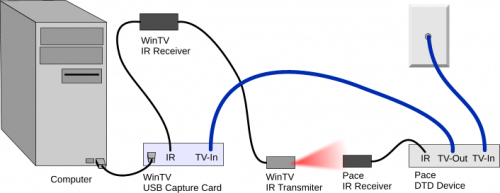
My Setup Looks like this:
- OS: Ubuntu Hardy 8.04
- TV Capture Device: WinTV-PVR external USB
- Remote: WinTV-PVR (Microsoft Media Center USB Phillips)
- Cable DTA: PACEDTA
Your setup may differ, but hopefully this tutorial will work for you as well.
The only thing the new digital converter box breaks is the ability for Myth to change to the appropriate channel. The PACEDTA requires that my tuner stay on channel 3 or 4 and that I change channels using the remote provided with the PACEDTA. So basically we just need to configure Myth to send the same signal to the PACEDTA that the included remote would send when we change the channel. So the first thing we need to do is an external IR transmitter working via Lirc.
I assume you already have an external remote setup to control your MythTV box and that you have Lirc already installed.
If you do not, see this tutorial https://help.ubuntu.com/community/InstallLirc/Hardy
1. Install the Remote IR Transmitter
Your encoder card most likely came with an external Infrared Transmitter. Check your box, they can be very tiny.
1.1 Plug your external IR Transmitter into your encoder card. On my WinTV-PVR this is actually located on the back of the IR Transmitter.
1.2 Restart Lirc
sudo /etc/init.d/lircd restart
2. Configure and test the Remote IR Transmitter
2.1 Configure Lirc to talk to the remote transmitter
sudo dpkg-reconfigure lirc
Select your remote control for the first option, and then select your transmitter as the second option. For my configuration I select the following:
- Windows Media Center Remotes (new version Philips et al.) for the Remote and
- Microsoft Windows Media Center V2 (usb) : Motorola Cable box for the transmitter
Note: If you are not asked to select an IR Transmitter you may need to reboot.
Also Note: the second portion of the IR Transmitter selection is not important, we will fix that in a minute. For now it is just important that we get the proper device.
[g2:6635] [g2:6632]
2.2 Test the IR Transmitter
In order to test your transmitter we need to take a peek at /etc/lirc.conf and then peek at the conf for the transmitter.
cat /etc/lirc/lircd.conf
Form me the part that references the transmitter is an include
#Configuration for the Microsoft Windows Media Center V2 (usb) : Motorola Cable box transmitter:
include /usr/share/lirc/transmitters/motorola/dctxxxx.conf
So I need to cat this file to get the device name for the transmitter
cat /usr/share/lirc/transmitters/motorola/dctxxxx.conf
#
# this config file was automatically generated
# using lirc-0.6.6(serial) on Fri Mar 28 22:46:44 2003
#
# contributed by shane bradley
#
#
#
# brand:                       Motorola
# model no. of remote control: DCT2000
# devices being controlled by this remote:
#
begin remote
  name  DCT2000
  bits           16
  flags SPACE_ENC|CONST_LENGTH
Note the name which in this case is DCT2000. With this information we can manually tell Lirc to send an infared signal to test that the transmitter is working.
type:
irsend SEND_ONCE DCT2000 1
Where DCT2000 is the name of your device. You should see a red light flash on your transmitter. If you do not see a light flash, maybe your transmitter doesn't have a light. Another way to test for a signal is to film the transmitter with a video camera. You will see a glow when the transmitter sends an ir signal.
OK, so you have Lirc talking to your transmitter - Sweet.
3. Create a config file for the PACEDTA
Since the config file we chose when setting up the transmitter was for a motorola cable box, the PACEDTA box will not understand the signals we are currently generating.
3.1 save the following to /usr/share/lirc/transmitters/pace/pace.conf or dowload it here pace.conf_and_change-channel-lirc.pl.zip
# contributed by Mike Silliman
#
# brand: Pace
# supported devices: Pace DC50X (Comcast Digital Transport Adapter)
#
# Protocol: XMP-R
# Device: 62.16

begin remote
name DC50X
flags RAW_CODES
eps 30
aeps 100
gap 80412
begin raw_codes

name 1
210 894 210 1709 210 763
210 2787 210 1315 210 1315
210 1157 210 2656 210 13805
210 894 210 2656 210 763
210 763 210 763 210 894
210 763 210 763 210 80413
210 894 210 1709 210 763
210 2787 210 1315 210 1315
210 1157 210 2656 210 13805
210 894 210 1578 210 1841
210 763 210 763 210 894
210 763 210 763 210

name 2
210 894 210 1709 210 763
210 2787 210 1315 210 1315
210 1157 210 2656 210 13805
210 894 210 2524 210 763
210 763 210 763 210 1026
210 763 210 763 210 80413
210 894 210 1709 210 763
210 2787 210 1315 210 1315
210 1157 210 2656 210 13805
210 894 210 1446 210 1841
210 763 210 763 210 1026
210 763 210 763 210

name 3
210 894 210 1709 210 763
210 2787 210 1315 210 1315
210 1157 210 2656 210 13805
210 894 210 2393 210 763
210 763 210 763 210 1157
210 763 210 763 210 80413
210 894 210 1709 210 763
210 2787 210 1315 210 1315
210 1157 210 2656 210 13805
210 894 210 1315 210 1841
210 763 210 763 210 1157
210 763 210 763 210

name 4
210 894 210 1709 210 763
210 2787 210 1315 210 1315
210 1157 210 2656 210 13805
210 894 210 2261 210 763
210 763 210 763 210 1315
210 763 210 763 210 80413
210 894 210 1709 210 763
210 2787 210 1315 210 1315
210 1157 210 2656 210 13805
210 894 210 1157 210 1841
210 763 210 763 210 1315
210 763 210 763 210

name 5
210 894 210 1709 210 763
210 2787 210 1315 210 1315
210 1157 210 2656 210 13805
210 894 210 2130 210 763
210 763 210 763 210 1446
210 763 210 763 210 80413
210 894 210 1709 210 763
210 2787 210 1315 210 1315
210 1157 210 2656 210 13805
210 894 210 1026 210 1841
210 763 210 763 210 1446
210 763 210 763 210

name 6
210 894 210 1709 210 763
210 2787 210 1315 210 1315
210 1157 210 2656 210 13805
210 894 210 1972 210 763
210 763 210 763 210 1578
210 763 210 763 210 80413
210 894 210 1709 210 763
210 2787 210 1315 210 1315
210 1157 210 2656 210 13805
210 894 210 894 210 1841
210 763 210 763 210 1578
210 763 210 763 210

name 7
210 894 210 1709 210 763
210 2787 210 1315 210 1315
210 1157 210 2656 210 13805
210 894 210 1841 210 763
210 763 210 763 210 1709
210 763 210 763 210 80413
210 894 210 1709 210 763
210 2787 210 1315 210 1315
210 1157 210 2656 210 13805
210 894 210 763 210 1841
210 763 210 763 210 1709
210 763 210 763 210

name 8
210 894 210 1709 210 763
210 2787 210 1315 210 1315
210 1157 210 2656 210 13805
210 894 210 1709 210 763
210 763 210 763 210 1841
210 763 210 763 210 80413
210 894 210 1709 210 763
210 2787 210 1315 210 1315
210 1157 210 2656 210 13805
210 894 210 2787 210 1841
210 763 210 763 210 1841
210 763 210 763 210

name 9
210 894 210 1709 210 763
210 2787 210 1315 210 1315
210 1157 210 2656 210 13805
210 894 210 1578 210 763
210 763 210 763 210 1972
210 763 210 763 210 80413
210 894 210 1709 210 763
210 2787 210 1315 210 1315
210 1157 210 2656 210 13805
210 894 210 2656 210 1841
210 763 210 763 210 1972
210 763 210 763 210

name 0
210 894 210 1709 210 763
210 2787 210 1315 210 1315
210 1157 210 2656 210 13805
210 894 210 2787 210 763
210 763 210 763 210 763
210 763 210 763 210 80413
210 894 210 1709 210 763
210 2787 210 1315 210 1315
210 1157 210 2656 210 13805
210 894 210 1709 210 1841
210 763 210 763 210 763
210 763 210 763 210

name Enter
210 894 210 1709 210 763
210 2787 210 1315 210 1315
210 1157 210 2656 210 13805
210 894 210 1841 210 763
210 763 210 1026 210 1446
210 763 210 763 210 80413
210 894 210 1709 210 763
210 2787 210 1315 210 1315
210 1157 210 2656 210 13805
210 894 210 763 210 1841
210 763 210 1026 210 1446
210 763 210 763 210

end raw_codes
end remote
Note: the device name in this config is DC50X. We will use this device name later on. If you change it you will also need to change it in the change-channel-lirc.pl perl script below.
3.2 Update /etc/lirc/lircd.conf to include this file instead of the previous one.
sudo nano /etc/lirc/lircd.conf
change
include /usr/share/lirc/transmitters/motorola/dctxxxx.conf
to read
include /usr/share/lirc/transmitters/pace/pace.conf
3.3 Plugin the external IR Reciever to the PACEDTA
Your PACE DTA from comcast should have included an external IR Receiver. According to other Tivo how-to's this is required for the PACEDTA to receive external IR signals.
This doesn't make a whole lot of sense, but I did not test without it. Also, to avoid interference from other remotes it is a good idea to just tape your external IR Transmitter from your capture card to your PACE external IR Receiver. Tape them together so that the transmitter/receiver parts are facing each other. Then you can put them wherever like behind your desk or entertainment center.
4. Now we need to create a simple perl script so Myth can change channels
4.1 copy and paste the following to /usr/local/bin/change-channel-lirc.pl or dowload it here pace.conf_and_change-channel-lirc.pl.zip
#!/usr/bin/perl
# Created by regx
# Simple perl script to change channels for Myth

# make sure to set this string to
# the corresponding remote in /etc/lircd.conf
$remote_name = 'DC50X';

$channel=$ARGV[0];
@channel = split(//,$channel);
foreach(@channel){
        #print $_ . "\n";
        `irsend SEND_ONCE $remote_name $_`;
}
sleep 1;
`irsend SEND_ONCE $remote_name ENTER`;
4.2 make the script executable
sudo chmod +x /usr/local/bin/change-channel-lirc.pl
5. Last step - Configure MythTV
Now just configure MythTV to use the Perl script to change channels and preset the tuner to the channel your tuner needs to be on for the cable box to work. The default is channel 3.
5.1 Open MythTV Backend Setup
mythtv-setup
Select Input Connections and enter change-channel-lirc.pl for the External channel change command. Enter 3 for Preset tuner to channel.
Here is a screen shot of my configuration.
[g2:6631]
If you run into problems, you can start MythTV at this point and test. I can open other windows on top of MythTV because I am running compiz, but you might have to configure MythTV so that it runs in window mode. With MythTV running you can run the Perl script and pass a channel as an argument.
change-channel-lirc.pl 13
You should see the cable box on screen display show that it is changing the channel.
Enjoy!